Create Lists
Create Lists is one of Sierra’s functions. It allows you to compile lists of records meeting criteria you determine, and is useful for cataloging, circulation, acquisitions, and serials. Please contact a MORE staff member if you do not see Create Lists in the function dropdown in the upper right part of your Sierra window. The more you use Create Lists, the easier it will be to use. You will see how powerful it is in finding the information you need.
Before you begin, decide what it is you want to search for. Examples include:
- Missing items for searching and possible replacement
- Long-billed items for possible replacement
- Patrons whose records have expired
- All the titles in your U.S. history section for kids
- Patrons whose cards are blocked due to fines
Think about what result you are looking for so you know what search criteria you will need to use.
Getting Started
To start, select the Create Lists function from the upper-right dropdown. You will see the initial list screen with all the review files. Note: “Review File” is another name for a list compiled using the Create Lists function.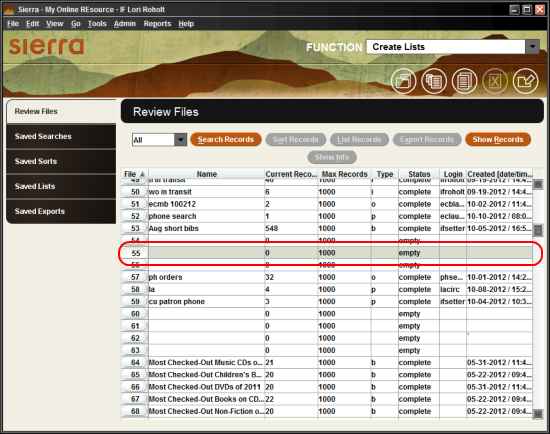
First steps for a new review file
To create a new list, choose an empty review file with the approximate number of records you think you will find. Empty review files have:
- a blank name field
- “empty” in the status column
The number in the Max Records column indicates how many records that review file will hold. If your file fills up when you generate your list, it’s likely you have not found all the results of your search; choose a file with a larger number of records and try again.
Note: The files are sortable by column. The default sort is by file number, or roughly by list capacity. You can re-sort by clicking on any column header (Name, Current Records, etc.). Using MORE’s recommended naming convention of beginning your Review File Name with your library’s two-letter code, all your lists will be grouped together when you sort by name. If you want to find which files you created, sort by username and find your Sierra username in the list.
When you find an appropriate empty review file, select it by clicking, then select “Search Records”: one of the orange buttons above the list of review files. A smaller window will appear where you specify all the details of your list.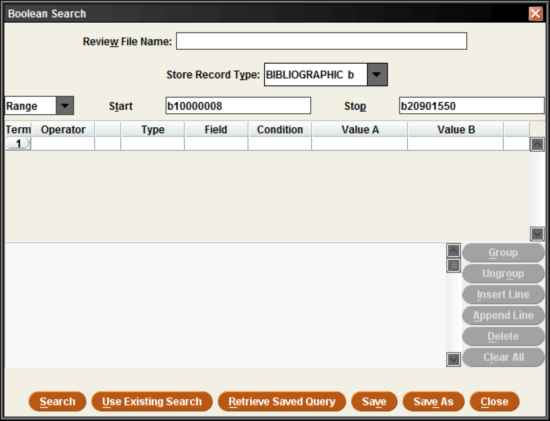
Naming review files
Name your file. Always start with your 2-letter library code, add a word or two to identify what the list is, and put in a date to indicate how long you want to keep the file. This is extremely important. Because we all have to share the files, an old list, or one not properly identified, will be deleted if the space is needed!
Examples of list names:
- BA lost or missing til 10-15-13
- OS expired patrons til 10-10-13
- DP easy books til 10-30-13
Select a record type
Select the type of record you want to make a list of from the “Store Record Type” dropdown. Note: Choose carefully! Working with a list that is based on the wrong record type can have unintended consequences.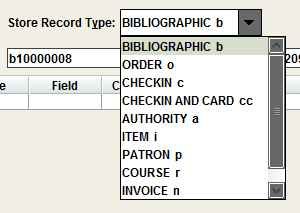
The most-commonly used record types are:
- Item: to find items in your collection for weeding or tracking purposes, for example
- Patron: to find patrons who meet certain criteria, like owing fines or living in Dunn County
- Order: to find order records still in the system by vendor or price, for example
- Bibliographic: to find title-level records, like Agatha Christie books owned system-wide, or videos from the 1980s.
Choose which records to search
Choose how you want to search the database by selecting one of the options in the dropdown:
- Range is a numeric range of record numbers. The default is the entire database.
- Review is searching within another review file. (Directions below.)
- Index is searching by a specific field, like among all records with “Steel Danielle” in the Author field. The fastest way to find items belonging to your library is to search by barcode index. This tells the system to only search among items with barcode values in your library’s range, reducing the time your search will take.
Searching an index
If you choose index, next you have to choose which index, or field, you want to search. If you are making a patron list, you will have these choices: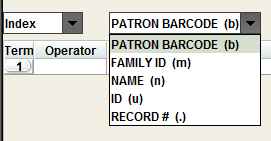
If you are making an item list, you will have many more choices: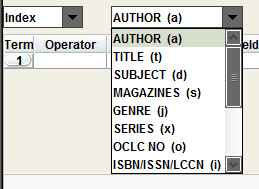
Barcode is the one you want to use if you are searching all your items.
Enter the first 5 numbers of your barcodes in the first box, and the first 5 numbers plus 1 in the second. Here is an example for Turtle Lake’s items, whose barcodes all begin with “30986”:
Setting your search criteria
Now you must enter what you want the system to search for.
NOTE: You need to be aware of which record type contains what data. The bibliographic record has the information about the title such as author, title, publication date, subject headings, etc. The item record has the information about individual copies such as the location code, call number, barcode number and the date the item record was created. You will need to know this in every step in the Create List process.
If you double click in any box you will get a chart of all available choices for that field.
Under Type, choose which record type you want searched. The choices you are given depend on what you chose for Store Record Type.
For item records you will see: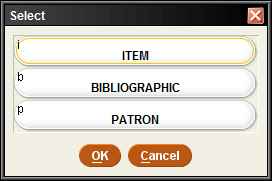
For patron records you will see: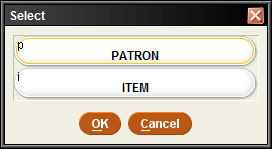
This is because links exist only between certain types of records. An item is linked to the bibliographic record it is attached to, and if that item is checked out there is a link to the patron that has it checked out. A patron is only linked to the items checked out at the current time. A bibliographic record is linked to the items attached to it, order records (used in Acquistions) and checkin records (used in Serials).
The Field box is for the data you want searched in the record type you indicated.
For item records, both fixed fields (fields that only accept certain values) and variable fields (free-form fields you can type anything into) are available for your search: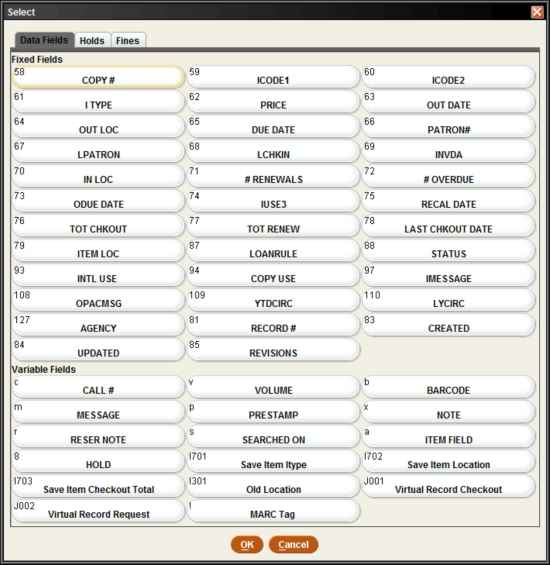
Click on the box with the Field you want searched and click OK.
For patron records you will have these choices: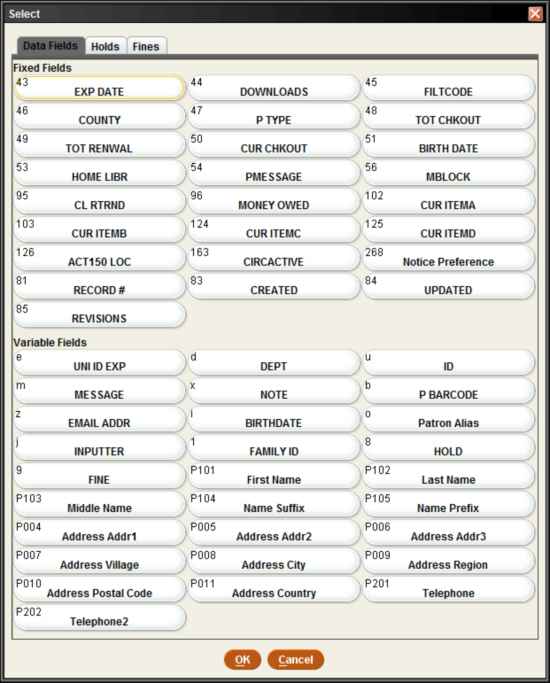
Again, both fixed fields and variable fields are available.
Choose the Field you want searched and click OK.
Next choose the Condition: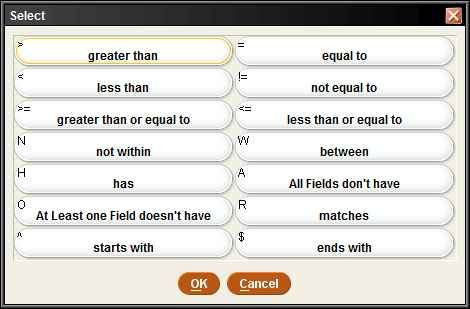
- Use equal to (=) if you’re looking for an exact match (used for location codes, statuses, and other fixed fields)
- Use greater than (>) or less than (<) when searching dollar figures or dates. For dates, less than (<) means “before.”
- Use between if you’re searching a range. Both values entered will be included in your results, along with any between.
- Use has if you’re looking for holds or a partial value (call number Has FIC or message Has in transit)
And click OK.
Then enter the Value to search for. Your choices will depend on the data field chosen. Most values will go in the Value A box. Value B is used when using the condition Between.
If you chose Item for Type and Status for Field you will have these choices for Value: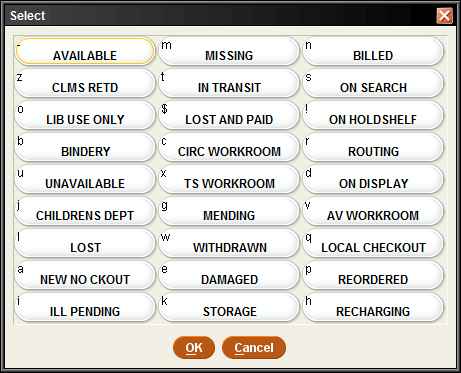
Click on the Value you want and click OK.
Once you become familiar with your choices you will be able to enter the data you want directly into the field. The small letter or number in the upper left corner of each box is the shortcut to that value. Just type it in.
As each value is entered into its field, a search string is written in the box below the input fields. If you entered Patron type, expiration date is less than 8-1-02, you will see: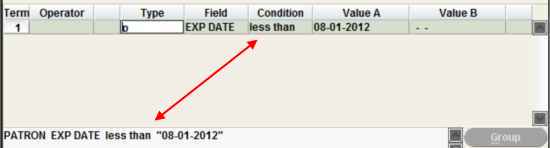
If you want to add a second line to either refine or expand your search, click on Append Line from the menu on the right side of the screen: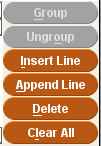
- Insert Line will insert a line above the line that is highlighted
- Append line will add a line to the bottom
The Operator is either “and” or “or”. If you want all the records in your list to match all of your criteria, use “and.” If you want to retrieve records with at least some of your criteria, use “or.” Then continue across the line filling in the fields as you did for the first line.
A second line for an item search for materials that are either missing or billed would look like this: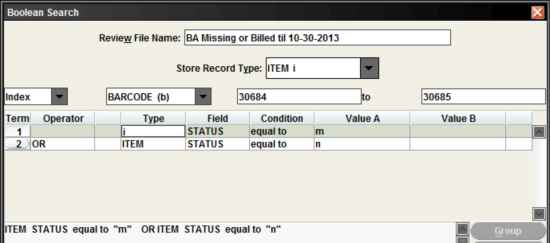
Here the operator is “or” because you want to find items with either status. If you use “and” you would get no results because an item can only have one status.
Executing your search
When you are satisfied with your search string, click “Search” on the bottom of the screen.
Other options:
- Use Existing Search allows you to use the same search criteria as an existing review file, which you can then edit.
- Retrieve Saved Query means using a saved search.
- Save saves your search – this is ONLY used when you have a complicated search (4 or more lines) you do on a regular basis (at least monthly). As a general rule we do not save searches because there is a limited number we can save and they are difficult to locate in the long list.
- Save As is used when using a saved search and you want to save it with a new name.
- Use Close when you have started to create a list and change your mind – it closes the file without doing anything.
After seleting “Search” you will be flipped back to the main list screen, and you will see your list is “In Progress”:![]()
When it is done, in progress will change to “complete”:![]()
Using your completed list
Now you have several choices about what to do next. Across the top portion of the screen are these buttons:
-
- The left-side dropdown has a default value of “All,” meaning that all used and empty review files are displayed below. You can change this to limit the display of lists to those that are complete, in progress, empty (an easy way to find an empty list fast) or limited (an option we don’t use).
- Search Records is where you started.
- Sort Records means sort the file according to the fields you choose.
- List Records means to Print them.
- Export Records allows you to save the file as a text file and then open it in Excel.
- Show Records will display the list of the records found, where you can look at each one and edit it if you choose. You can also remove records from your list if you find they don’t fit what you were looking for.
- Show Info displays the search criteria used to create the list.
Sorting Records
Before printing or working with the file, you may want to sort the records in your list.
Click on Sort records. This Sort screen will come up blank and you will need to fill in the lines with how you want the list sorted: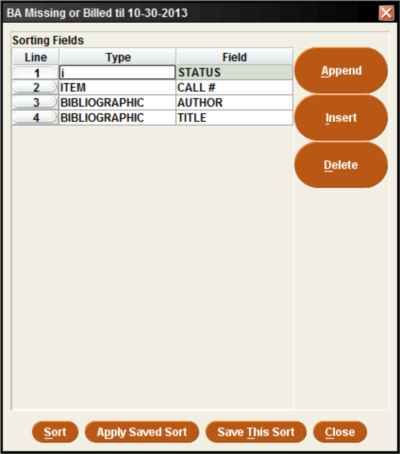
Double-click in the white box under Type or Field to see all of your record type and field options. Click on Append on the right side to add a line to your sort.
- Type is which record type has the field you want to sort by
- Field is which part of the record containing the information you want to sort on. Click append and fill in lines for as many ways you want the list sorted. They will sort in order you put them in. In this example, item status will be first (as this list was for two different statuses, I wanted each status to be grouped together), then alphabetically by call number, author, and title.
Click Sort. You will again be flipped back to the main list page. You will see “sorting” in the status field, and “complete” when it is finished.
Printing Lists
Click on “List records.”
Here is the screen where you will enter which parts of the record you want on your list. You do not want the whole record; pick only those fields that you need.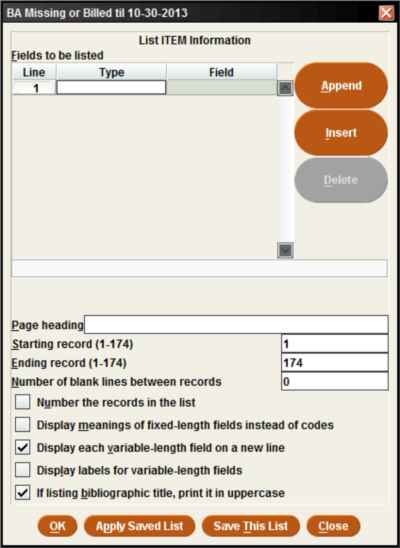
As with sorting, click append and enter the type and field information.
- For Page heading, type in the title you want on the top of each page of your list.
- If you do not want to print the whole list, enter the starting and ending numbers of the portion of the list you want to print.
- If you want any blank lines between records, enter the number here. Using 1 separates each record and makes the printout much more readable. You may not want to do this for long lists.
- If you want the records numbered, check that box.
- If you want fixed field meanings printed, check that box. If selected, the item location “basci” prints as “Baldwin Science Fiction.”
- If you want each variable field on a new line, check that box. This is very helpful for readability, but it is not practical for very long lists.
- If you want variable field labels printed, check that box. If selected, when printing the title, the word Title will appear before each title.
- If you want the title in uppercase, check that box.
Here is a completed screen: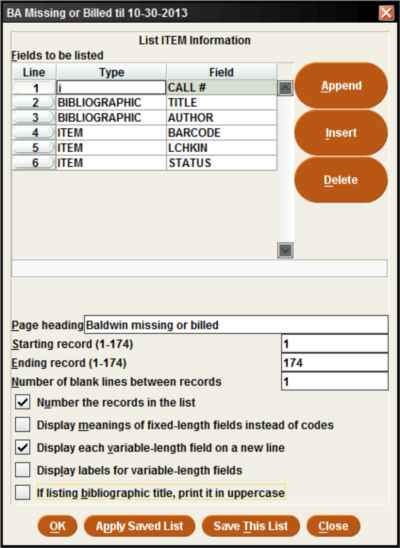
When you are ready, Click OK.
You will see this screen: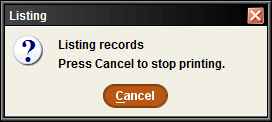
This will take a moment or two, then it will print to the printer specified as your Standard Printer (under File – Select Printer – Standard Printer).
These specifications will result in a printout that looks like this: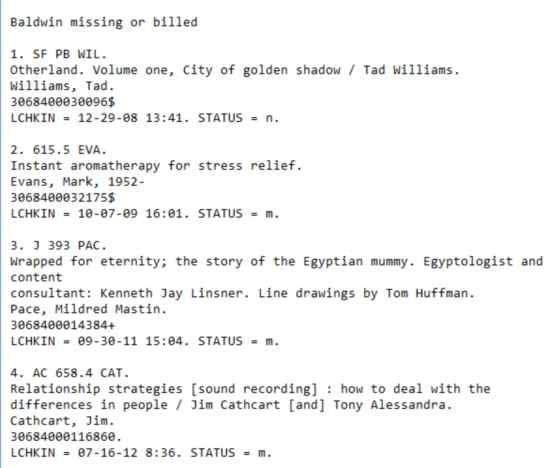
Grouping Search Lines
When you are mixing “and” and “or” searches on more than 2 lines it is necessary to group search lines in order to get the desired results. For example, if you are creating a list for weeding and you want to include 2 location codes and add that the record must be older than 3 years and the total checkout less than 3, you would start with this:
In order to have both the “and” lines apply to both the location codes, you must group the “or” lines together by highlighting both of them and clicking Group. This puts parentheses around the two lines in both the search lines and the box below like this: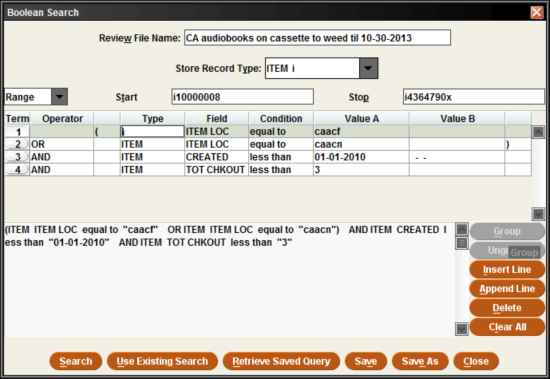
If you don’t group the “or” lines the created date and the total checkout will only apply to the second location code. If a search strategy does not get you the results you wanted, check that your “ands” and “ors” are properly combined.
Another example of when grouping is needed is if you are combining two different scenarios. While you could create two separate lists, creating a single grouped list may save you time in printing or exporting records. Let’s say you want to find fiction audiobooks with a total circ less than 5 and nonfiction audiobooks with a total circ less than 3. Here you would group the location code with the desired checkout figure and “or” the 2 groups together like this: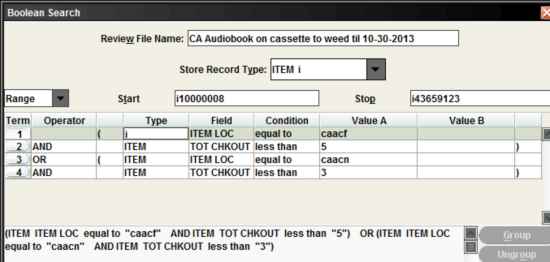
Searching Within a List
If you want to create a list of a subset of records from a file you already created, you can use the first file as the source of your new file. Choose an empty list, name it, store the correct record type, and then change the source from Range to Review.
Tip: When you click on the arrow for the drop down list of list names, the list numbers are not shown; to quickly find your list, type the first letter of the name. The highlighted line will jump to the next list starting with that letter. Continue to type the letter until the list you are looking for is highlighted.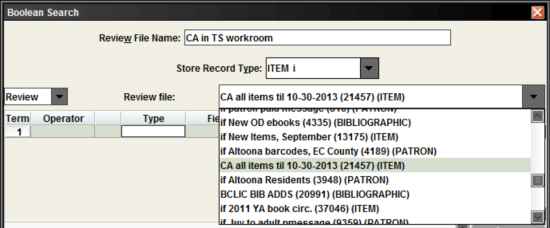
Example: you have a list of all your library items and after running it through statistics you notice that a large number of items have a status of TS Workroom and you know there shouldn’t be that many. So from your list of all items you are going to create a list of all the items that have a status of TS Workroom so you can locate those items and check them in. Your search would look like this: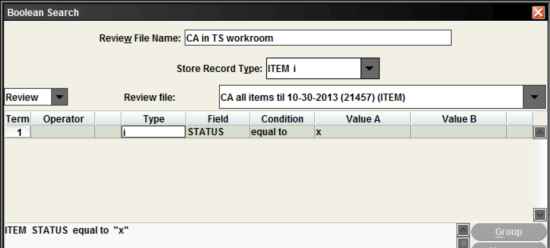
Once the list is complete you can sort it and print it and you will have a nice organized list to work from.
Using an Existing Search
If there is an existing list that has not been emptied yet and you want to use the same or very similar search for another list, you can use that existing search. This saves time in entering all the search criteria over again when you are doing the same type of search multiple times. This can also be useful if you choose a file with fewer ‘Max Records’ than you needed. You can choose a file with a greater number of records and use the existing search from your first try to create your list.
Example: you have a weeding list of your audiobooks on cassette and you want to create the same kind of list for your videos. Choose an empty list, name it, choose the record type to store, then click Use Existing Search at the bottom of the search screen: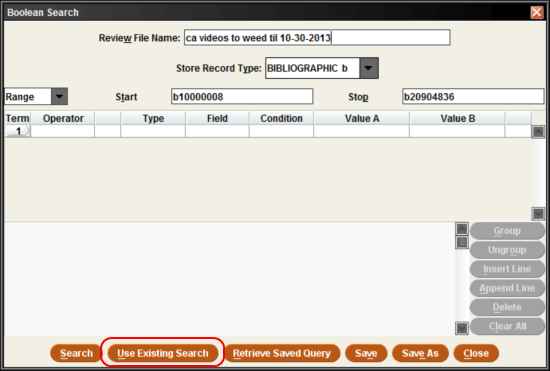
This will bring up the list of files. By default, existing searches are listed by file number at the bottom of the window. If it’s helpful, click on the ‘Name’ column heading to re-sort the list by name. Highlight the file with the search you want to use (you will see a preview on the top part of the screen) and click Use at the bottom of the screen: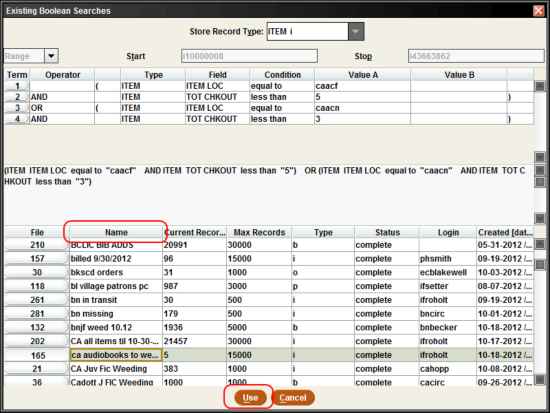
This will transfer the search to the new list you are working on. Then you can make the changes for your new search. In this example, only the two location codes needed to be changed and the search is ready to be run: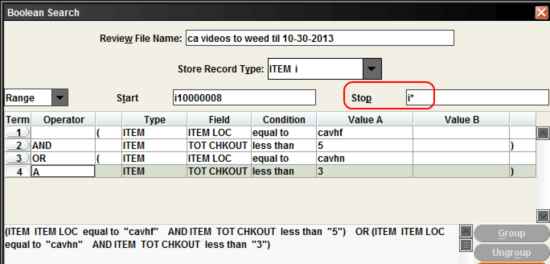
Note: If you’re searching across a range, check that the “Stop” value for your new list is appropriate. Your new list will “inherit” the same range used in the existing list. That is, if you want to search across all records for your new list, including those added since the existing search was run, change the stop value to i* to catch all items.
Copying a File
Sometimes it is necessary to copy or move a file from one list into another. The most common reason to do this is when the number of records in your list is much smaller than the number of records the list can hold (you overestimated the number of records you would find, or accidently chose a list with 100,000 records instead of 10,000). It’s important not to take up a larger list than you need because when you need a big list a small one won’t do; please be considerate and move your list to a smaller file when that happens.
To copy a list, make note of the number and name of the list you want to copy.
Here is a list with 5 records in a list that will hold 15,000:![]()
Highlight an empty list with an appropriate number of records and click the Copy icon at the top of the screen: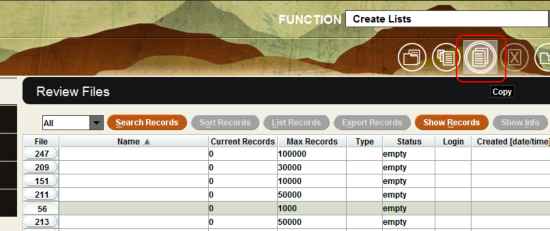
The Select file to copy from box will pop up. Type the file number into the top box, or scroll down the list until you find the file you want to copy. Click on it to highlight it, then click OK: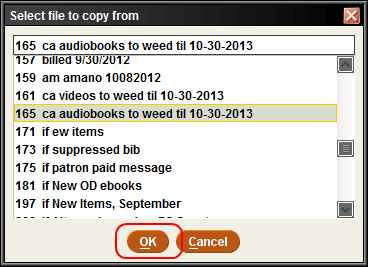
The file will be copied into the list number you selected. The original created date will remain in the Created column:
Important: Once the file is copied, you must go back to the original list and Empty it.
Note: MORE staff will copy files into more appropriate list sizes when a larger list is needed for a project and there are no empty lists available. If a list is not in the number where you left it, sort by name and look for it. Also remember that if there is no “until date” in the name and the list is older than a month, MORE staff may empty it.
Emptying Lists
When you no longer need a list you must empty it so it is available for others to use. Most lists can be emptied the same day they are created if you are printing it and working from the printout. If you don’t need the list please empty it, and if you’re working from it please empty it as soon as you are done.
To empty a list, highlight it and click the Empty icon at the top of the screen: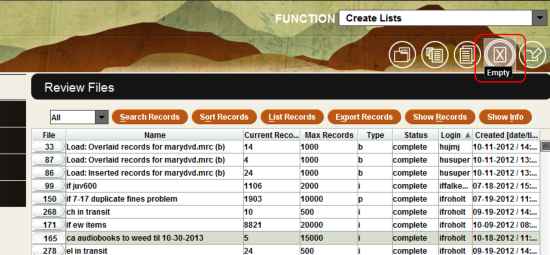
You will be asked if you are sure: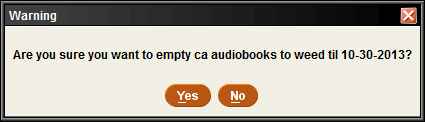
Please double check the name to make sure this is your list and you mean to empty it. Then click Yes. Once a list is emptied you cannot un-empty it, but if it was emptied by mistake you can also create it again.
Working in a List
If you have a list with coding errors, you can work from the list to correct the errors, then remove the records from the list as they are fixed. This leaves only the records still needing attention in the list. It is this type of list that needs a “until date” so you have adequate time to work on it.
To open a list of records, double click on the file, or highlight it and click Show Records: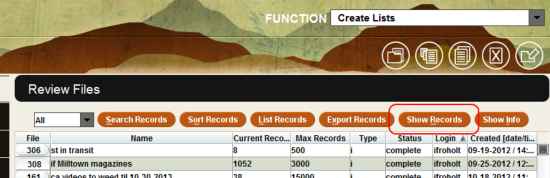
The list of records will open, showing record number and Description (title or patron name):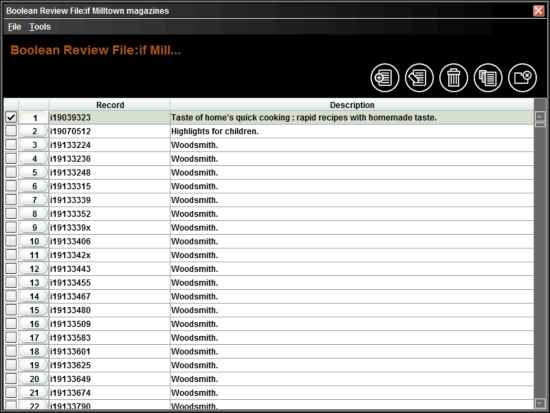
To open an individual record, double click on the line, or highlight it and click edit.
Here you can make any changes needed. When done, click Save.
Removing Records from a List
If you no longer need a record in the list, you can remove it by clicking the Remove icon at the top of the screen.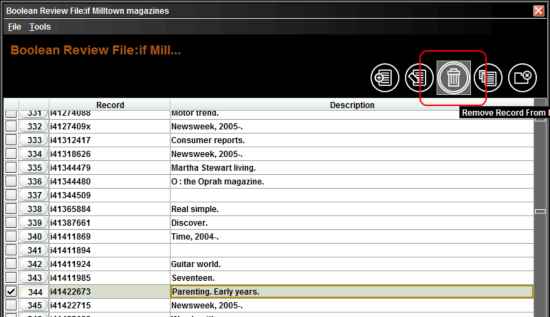
Note: make sure you have highlighted the line you want removed. Once removed, it can’t be retrieved automatically.
This only removes the record from the list.It does not delete the record from the MORE database.
MORE staff are available to help with search strategies when creating lists. If you have trouble getting the results you want, contact MORE staff for help.
Exporting a List
You may wish to export a list to open and work with it in a spreadsheet format in Excel. This allows you to view selected record information, sort, limit, filter, subtotal, and perform other data manipulation.
In the Create Lists function, highlight the list you wish to export and click Export records:
If you are exporting from a function other than Create Lists, find an Export button (usually in the upper right). You may need to select an option from an Export Table window. The “Save as comma separated values (csv) text” option usually works well in that case. You will not need to designate fields to export, so you can skip the following step.
In the Export Information box, you will need to list the fields from your records that you wish to export. This is similar to sorting and printing. For this list of newly-added patrons, the export will include the patron record number, name, home library, and total checkouts.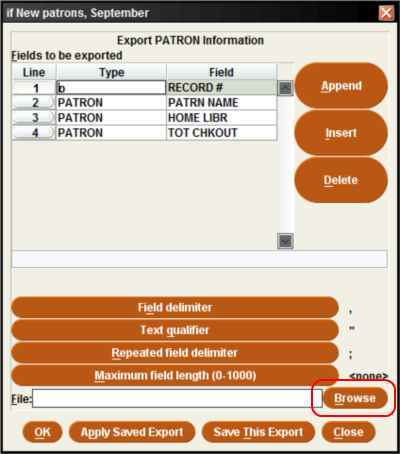
Leave the delimiter and qualifier boxes on the bottom half of the screen as they are.
You need to name and save your file:
- Click on Browse to find the spot on your computer where you want to save the file.
- For File Name, enter a name +.csv (ex: ‘newpatrons20210923.csv’)
- For Files of Type, select All Files
- Click Save

This will enter the file path and name in the box on the Export screen
Click OK. You will get a message box telling you the file is being exported, which will disappear when it is done.
You will now leave Sierra and work in Excel. Find the saved file and open it. If your CSV file does not open in Excel by default, you may need to right-click and “Open with…”, then choose Excel.
You will see your information in the columns of the spreadsheet. You may have to re-size the columns to fit the text.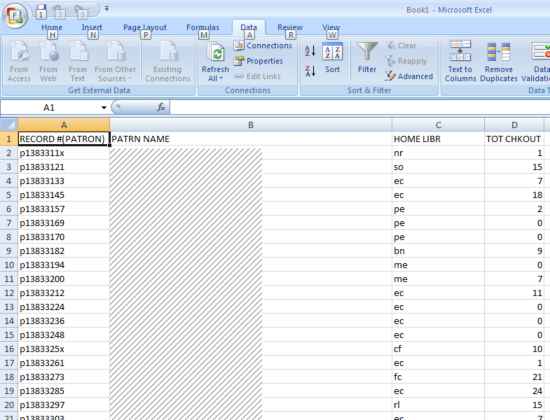
You can now work with the data as you would in any spreadsheet, and save it as an Excel file.