Fines and fees
Collecting fines
From the Check Out (Circulation Desk) function, scan the customer’s library card, or enter their name (nJones Adam). This will bring up the customer’s patron record. If customer owes fines, the Fines tab will be red.
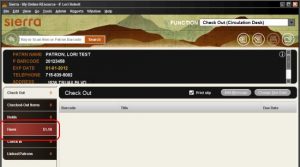
Click on the FINES tab and highlight the fines to be paid. If all fines are to be paid, click on the column header ALL.
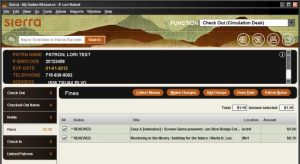
If a patron would like to pay a fine on only one of the items, you should highlight the item. If a patron is making a partial payment, highlight all the fines. Note: do not collect partial payments for replacement fees on other libraries’ items or their associated billing or processing fees.
Select COLLECT MONEY. The total amount owed will be in the screen. Change the amount if the patron is paying only part of the fine.
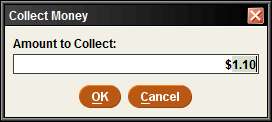
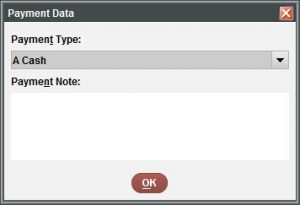
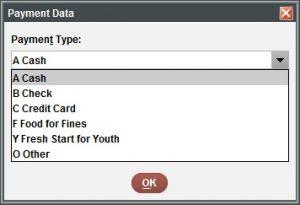
Click OK. A Payment Data window will appear. Select a Payment Type from the dropdown and, optionally, add a Payment Note.
A Print Fines (receipt) window will appear if the patron is paying their fines in full.
If the patron provides a partial payment, it will be applied from the first fine on down the list until the money is gone. In this example, a $1.00 payment will pay the first fine and not the second one. When there are remaining fines, you will be asked if you want to waive the rest:
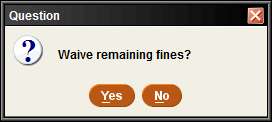
Click yes or no. The receipt screen will appear.
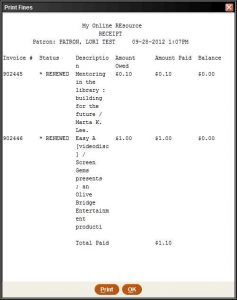
To print a receipt, click on Print. A receipt will print out and this screen will close.
If the patron does not want a receipt, click OK. This screen will close.
What to do with collected fines and fees
- Regular overdue fines collected at a library stay at that library regardless of the ownership of the overdue items.
- Replacement costs must be returned in full to the owning library along with the MORE reimbursement to other MORE library form. The item location code will tell you which library owns it. Please try to have the patron make out a check to that library for the amount owed. Note: do not collect partial payments for other libraries’ replacement fees or their associated billing or processing fees.
Exception: replacement costs paid on items with the item location code “more” (MORE High Demand) may be collected and kept by the library collecting the payment.
- Billing fees, which remain as a fine when a billed item is returned, must be sent to the library that sent the bill, which is the same as the owning library, along with the MORE reimbursement to other MORE library form. (Not many libraries charge billing fees so you will rarely encounter this.) The fees are meant to offset the cost of sending the bill, which the library has done.
- Processing fees, which may be associated with a billed item, but are waived if the item is returned. Must be sent to the library that sent the bill, which is the same as the owning library, along with the MORE reimbursement to other MORE library form. (Not many libraries charge processing fees so you will rarely encounter this.) The fees are meant to offset the cost of processing a replacement item.
- Manual charges (for damaged items, missing parts, or anything else) must be returned to the charging library, along with the MORE reimbursement to other MORE library form. This information is in the location column of the charge.
- Collection Agency fees must be returned to the library that sent the patron to collections, along with the MORE reimbursement to other MORE library form. This information is in the patron type field in the patron record. The patron type will be specific to one of the libraries using the collection agency; they only send their patron types to the agency.
Waiving fines
You may waive overdue fines for any patron served directly by your library, in accordance with your local policy. See MORE’s Fine-Waiving Policy.
If you need to waive a fine for a customer, follow the instructions above but instead of COLLECT MONEY, choose the WAIVE CHARGES button. You will be asked again if you want to waive the selected fine. Answer yes. A receipt will appear. Print or not according to the patron’s wishes. This will clear the charges from the patron’s record.
Adding a charge
If a charge needs to be added to a patron’s record, from their record click on the Fines tab, then select the ADD CHARGE button. The add charge screen will come up.
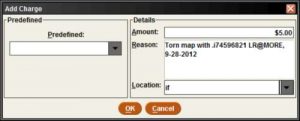
Select one of the Predefined charges on the left side, if any are applicable. Choosing a predefined option automatically generates a “Reason,” saving some typing time for common charges like copies and faxes. You can add more explanation in the “Reason” section manually.
Enter the AMOUNT to be added (i.e. $5.00).
Enter or add to the REASON for the charge. Be specific in this field–other libraries will also see these notes. Enter the date, your initials and the initials of your library in this field when adding a fine.
Verify the LOCATION (ex: if) where the charge is being added.
The amount is then added onto the patron’s library card.

Adjusting bill/fine amounts
If there is an error in a REPLACEMENT CHARGE or FINE AMOUNT on a patron’s card you will need to change the dollar amount to reflect the actual cost of the item/fine.
From the patron’s record, click on the Fines tab.
Select the item to be adjusted by clicking on the item. Right click on the amount and select VIEW THIS FINE.
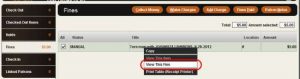
When the item appears, click the Adjust button and enter the correct amount of the charge.

Click OK and the screen will close. The amount is automatically changed.

Viewing the Fines Paid file
Select the Fines Paid function from the upper-right dropdown. You may need to scroll down to see it.
![]()
You can limit the report to fines collected during a certain period by filling in dates in the “Date Paid Between” boxes. When you first open the screen, the dates displayed will be for those fines that are still in the database.
To view the fines that were collected at your library, under “Limit Display By,” fill in the statistics group number (terminal number) for your circ login and/or the initials used for that login. If money was collected using another Sierra login and/or statistics group number, you’ll have to run the report more than once to capture all payments collected at your library.
Under “Owning Location” check “ALL” to see all fines paid at your library, no matter which library owned the items.
![]()
Click View Fines Paid.
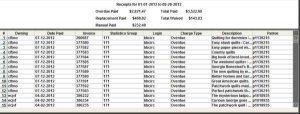
The report will show you the following information:
- At the top you will see the dates the report covers, the amount paid from Overdue fines, Replacement costs, and Manual charges; the total paid and the total waived.
- You can sort by any of the columns by clicking on that column header. The information in the columns is:
- Owning: If the fine is an automatic charge, this column displays the location that owns the item. If the fine is a manual charge or an adjustment, this column displays the location where the charge was created.
- Date Paid: the date the fine was paid.
- Invoice: the invoice number of the fine payment (this is automatically generated by the system at the time the fine is paid).
- Statistics Group: the terminal number of the login at the workstation where the patron paid the fine.
- Login: the login associated with the staff member who collected the fine.
- Charge type: Type of fine; replacement, overdue, manual charge, etc.
- Description: If fine is an automatic charge, this column displays the item title. If fine is a manual charge or an adjustment, this column displays the reason for the charge.
- Patron: the patron record number.
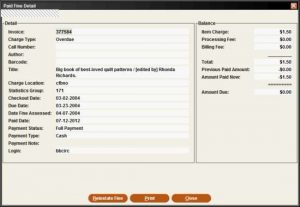
You can get the fine detail for any line by highlighting that line and either double clicking or clicking on the View Details button on the top of the screen.

The patron name, obscured here, is in the top left corner.
You can export the report into Excel to see all the fine detail and to save the report for future use. To do this, click on the Export icon at the top of the screen:

You will be given the following choices:
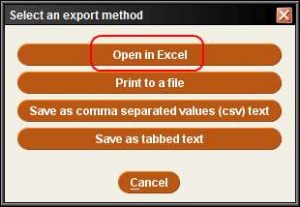
Choose Open in Excel. The file will automatically open in an Excel spreadsheet. You will have columns for: Date assessed, Patron name, Patron record number, Patron Unique ID (Driver’s license number), Invoice number, Charge amount, Processing fee, Billing fee, Charge type, Owning location, Date paid, Statistics group, Last payment amount, Login, Creation Mode (Automatic, Manual or Adjustment), Description (title or reason for manual charge), Amount paid, Payment status (Full payment, Partial payment, or Waive), Payment Type, and Payment note (if any).
Payment Type code meanings:
- A: Cash
- B: Check
- C: Credit Card (taken at the desk. Some libraries have this capability, usually via their city/village)
- e: Ecommerce (payment via the online catalog)
- F: Food for Fines
- Y: Fresh Start for Youth
- R: Read Off Your Fines
- O: Other
You can use any Excel functions to sort the data, add up amounts, etc.