
Templates are used when creating a new item record. They contain standard information with prompts to change or add information appropriate to the item you are working on.
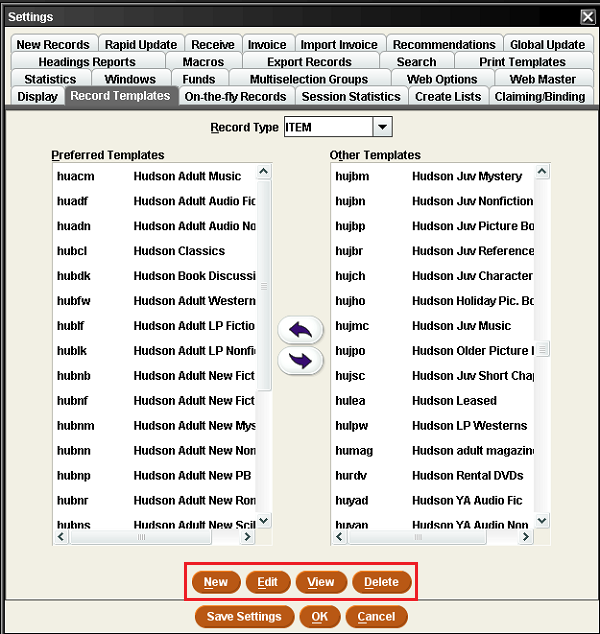
For item records, the templates used for your library will be listed under Admin – Settings – Record Templates. Change the Record Type to Item. All templates for your library should be listed in the left column under Preferred Templates. If a new one was created, it may be under Other Templates and you will need to move it over to the Preferred column. All those templates under Preferred are available in the drop down for New Records, where you choose which template you will use.
If there is a need for a new template, or if changes are desired for an existing template, you can do that from the Record Templates tab.
Creating Templates
To create a new template, click New.
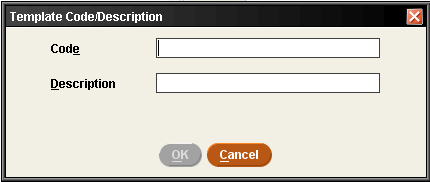
In the Template Code/Description box, fill in the five letter code you wish to use, starting with your library’s two-letters (this often is the same as the item location the template is for, but it doesn’t have to be; this is for the template name only and doesn’t affect anything else). For the description, start with your library name then add a brief description of what this template is for so anyone looking at it will understand its purpose.
Click OK when done.
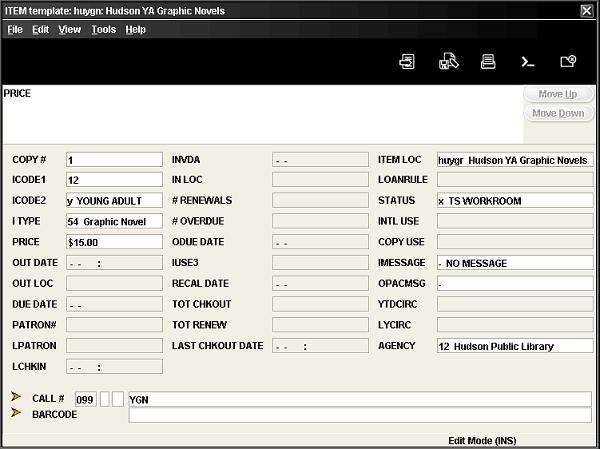
A blank item record will open. Fill in all the fixed fields that are not greyed out. Every one must have a value in it. These fields include: Copy #, Icode1, Icode2, I type, Price, Item Loc, Status (use x for TS workroom), Imessage, OPACmsg, and Agency.
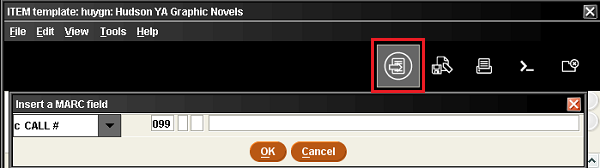
To add fields for call number and barcode, click the insert icon, use the dropdown to select the field you want, add any standard text (like a prestamp in a call number), and click OK.
To prompt a field so it pops up during the record creation process, click the prompt icon.

If this is a fixed field, the name of the field will appear in the box at the top of the template. If it is a variable field, a yellow arrow will precede it. You will want to prompt for any fields where the item information is likely to change from item to item. The most common fields to prompt are price, call number and barcode.
Here is a completed template:
Click Save when finished, then Close.
Editing Templates
If you wish to change something in a template, go to the Record Templates tab, change Record Type to Item if necessary, and click to highlight the name of the template you wish to edit. Then click the Edit button on the bottom of that window. The template will open, and you can edit any of the fields, or add a prompt. If you find a field that is prompted doesn’t need to be, you can take away the prompt by clicking in the field and clicking the prompt icon again. The field name or yellow arrow will disappear. Click Save, then Close.
Deleting Templates
If you find you no longer need a template and wish to delete it, find the template on Record Templates tab in Admin – Settings, and click to highlight it.
NOTE: You may only delete templates specific to your library: item, check-in or order templates, as long as all those concerned in your library agree. You may NOT delete any bibliographic templates, unless they were created by you specifically for your library.
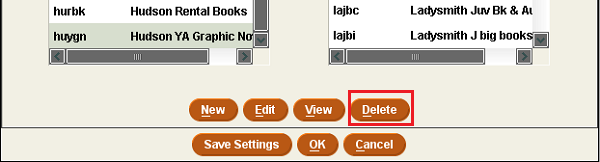
Click the Delete button. A warning pop-up will ask if you are sure. As the warning says, this deletes the template for all users so make sure everyone who catalogs in your library knows and agrees this template can be deleted.
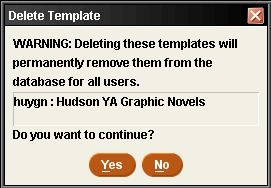
Click Yes. The template is deleted. Click Save Settings, and OK to close the Settings window.