Item Templates
Each library has the ability to modify/create their own item templates. In order to do this, go to Admin – Settings – Record Templates. At the drop down for Record type select ITEM. Click on the template you’d like to change then click Edit. You can change the call number information (i.e. DVD) as well as modify what is prompted when a new item is created. If you find yourself clicking through the item location for every item, you can adjust that field so it will not be prompted. You can also change the default price (magazines going from $3.00 to $5.00, for example).
Patron Records
Searching for a patron using Browse Query: You can search for patrons using known information from a patron record, like email address or birth date, using the Browse Query tool. Browse Query is a simplified create list search that does not save. This tool works well for quickly retrieving one piece of information that doesn’t need to stay in a file.
- In the Search / Holds function, go to Tools > Browse Query:
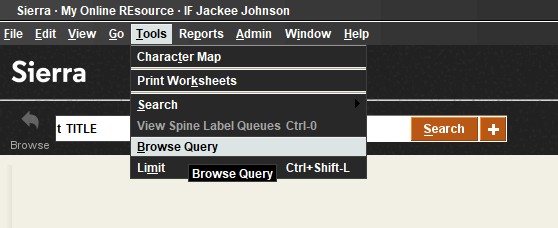
- In the Browse Query window, change the Store Record Type to Patron:
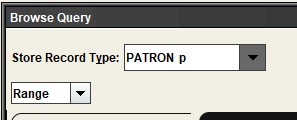
- Double click in each field to enter the search parameters.
- For Type, choose Patron.
- For Field, choose the specific data field you want to search. For example, if you know a patron’s birthdate, you could choose the Birthdate field. If you want to search by an email address, you can choose that field.
- For Condition, choose how to compare the data. For example, if you are looking for an exact match, choose Equal to. If you are looking for a partial match, use Has.
- For Value, enter what you are searching for.
Examples: Find a specific email address:

Find a specific birthdate:

Selecting a Recent Patron: When using Recent Patrons option, you can type the letter (along the left side of the name) to quickly select name rather than trying to mouse over.
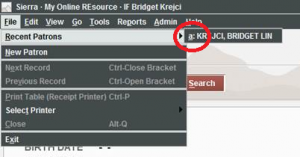
Recent patron history: You can adjust the number of records that are kept in the recent patron history (File-Recent Patrons.) Currently, the default is set at 5. This can be increased up to 10. To adjust this number, go to Admin – Options – Setup, way at bottom (see below).
Predefined fine list: In a patron record, when adding a manual charge in the Fines tab, you can click the drop-down in the predefined list then add the dollar amount.
Sorting checked out items: When you are in a patron record, click on checked-out items tab, middle bar by renew, drop down along the right can select Overdues and charges. This will limit checked out items to only those that are overdue, but will also show the current overdue charge for each item and the total next to status (along the top). Very useful for accounts with many items checked out and an easy way to calculate the current overdue charges as they are not accrued on the fines tab since they are not checked in.
Sorting: When you are in a patron record, you can sort any field (Barcode, Call Num, Location, Title, Due date, Status) by clicking on the header.
Check in tab in Check Out function: With no patron record up in the Check Out function, click on the check in tab along the left and scan in item. This will automatically open the patron record. This feature is wonderful if someone is returning an overdue item and wants to pay their fines immediately. Since the patron record is open, you can quickly switch over to the Fines tab to collect money.
View telephone notification log: When in a patron record, you can view telephone notification log. Go to View – Teleforms. It shows the status of the recent phone calls, providing the patron is set up for telephone notification.
Macros
Don’t forget about MACROS in Sierra! Macros can save you time by letting you automate relatively simple tasks (example: go to the check out screen) that you need to perform often, as well as complex procedures (example: adding fields for cataloging a bib record.)
Settings
Warning sounds: You can adjust the warning sounds (item warning, patron warning, etc.) in Sierra by going to Admin – Options – Sounds. Note that these sounds come from your computer’s speakers and are not the same as those that might come from your scanner itself.
Due slips: The text and Information on the due date slip can be adjusted. Go to Admin- Options – Due slip. (However due date slips should always be set without Patron information on slip)
Note:
- Please submit a help desk ticket if you’d like to adjust due date slip information but don’t have access to Options from Sierra’s Admin menu. Include the Sierra username that should be allowed to do this.
- There is a 40-character limit for each message line, so you may need to get creative!
- “Patron information on due slip” must be set to “Neither”
Searching
Browse query: In Search/Holds, Place Orders or Catalog function, go to Tools – Browse Query – It is a simplified create list search that does not save. This tool works well for quickly retrieving one piece of information that doesn’t need to stay in a file.
Check-in (no patron) function: When you are in the check-in (no patron) function, it is possible to use other access points besides the item barcode if you use the quick letter (ex. “t” followed by the title) or if you leave the search box empty and click on the search button. A search box pops up that works just like the search holds function. From the bib record’s summary screen you can highlight (click on) the copy you want to check in then hit “select” and it will be checked in. Ex., If you have a paging list and know the bib number but can’t find the book, you can look it up and check it in right within the check in function without having to go to search holds first to look up the barcode.
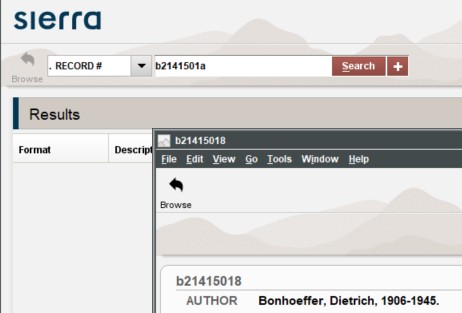
Finding a title in Sierra if you’ve already found it in the MORE Catalog: When viewing a title record in the main MORE Catalog, the end of the URL is the bibliographic record number in Sierra:
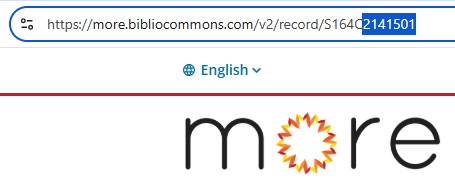
To find the record in Sierra, copy the 7 digits after /S164C from the address bar, go to Sierra’s Search/Holds or Catalog function and paste with a leading ‘b’ and a trailing ‘a’: