.
Receive/Create Item
General
- MORE has chosen to receive orders and create items in the same process
Receiving
- Choose Receive from the Function drop-down list

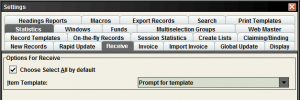
- Go to Admin/Settings
- Click on the Receive tab
- Select the appropriate template for the item(s) you are receiving
- Click OK to save your selection for your current Sierra session
- Retrieve the order record for the order you want to receive
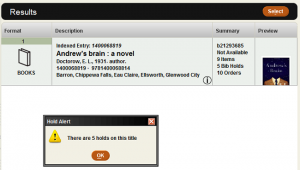
- If there is only one order record available for receiving, you are automatically placed in the Receive tab. If there are multiple order records, you are placed in the Summary tab. If that is the case, select the appropriate order record and choose Select
- If bibliographic-level holds have been placed on this record, you will receive notification of the number of holds placed on it
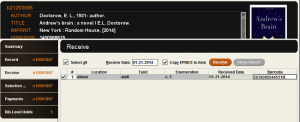
- Select the copies you want to receive. All copies are automatically selected when you enter the Receive tab. You can also de-select a copy by clicking the box on the left-hand side
- In the Receive Date box, today’s date is automatically entered. You can enter a different date in the Receive Date box if necessary.
- To change whether you copy the Order record’s EPRICE value to the PRICE field in the new item record(s), check or uncheck the Copy EPRICE to Item box.
- If you use the list price in the PRICE field in the order record, you should check the Copy EPRICE to Item box.
- If you are using the discounted price in the PRICE field in the order record, do not check this box. You will want to have the PRICE field prompted in the item template.
- You can set the default for this box by using the Default “Copy EPRICE to Item” option (in Admin/Options)
- Enter the barcodes for the copies you are receiving
- To receive the copies selected and create an item record for each, choose the Receive button
- Sierra uses the item record template selected in the Receive settings
- If Prompt for Template was selected, you will be prompted to choose a template for the first order record you receive. For subsequent orders in the session, the system will remember the template you chose. If you want to change to a different template, you should change the template before you choose the Receive button
- Enter the fixed- and variable-length fields for your template. Even if the template prompts you for location and copies, those fields are always taken from the order record
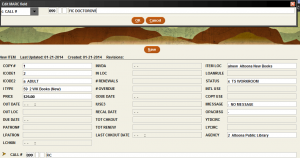
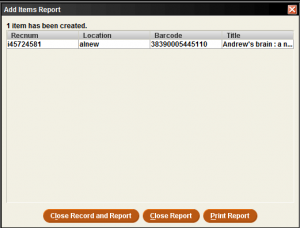
- After you have entered the new item record fields, Sierra displays the Add Items Report, which shows the number of items created and their record numbers, locations, barcodes, and titles.
-
- To print the report, choose the Print Report button
- To close the Add Items report and proceed with the next record, choose Close Record and Report.
- To close the report and return to record, choose Close Report
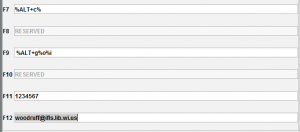
- To Close Report, a macro can be created. Enter the following in F7: %ALT+c%
- To return to the item summary screen to print a spine label, enter the following in F9: %ALT+g%o%i
-
- Select the appropriate item record (usually at the bottom of the summary list), and press CTRL plus L to print a spine label
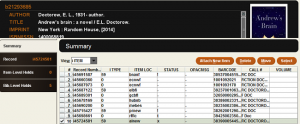
- To view a list of all the items you created during the current session, choose the Show Report button from the record display (located in the Receive tab)